Showing posts with label Recipes. Show all posts

Tuesday, May 25, 2010

Memorial Day

As I started to feel better yesterday and this morning, food began to sneak its way back into my mind. Since I am feeling better I thought what a better topic then food for Memorial Day? My thoughts started racing with ideas but I wanted to keep it simple and budget friendly. After thinking about what recipes I could use I had to think--reality Krysten--reality...What are people really going to eat?
Well I know people will cook out, have some side dishes, and of course dessert.
Simple enough.
These are easy and tasty dishes that your family will really enjoy.
Stuffed Turkey Burger
Fruit Salad Delight
Apple Almond Salad
Frosted Fudge Brownies

Stuffed Turkey Burger
1 1/4 pounds ground turkey
1 cup chopped onions and bell peppers(1/2 cup each)
1/2 cup shredded part-skim mozzarella cheese
2 tsp Cajun seasoning
1 tsp garlic salt
1/2 teaspoon hot sauce
1/2 teaspoon ground black pepper
1-2 tbsp olive oil

Mix ingredient in bowl. Add olive oil as desired to hold together and keep moist. Turkey tend to try out when cooked so the olive oil will help. Divide turkey mixture into 8 equal round sized burgers. Cook until done on grill or in stove. Approx. 5 minutes each side


Fruit Salad Delight
1 lg. can pineapple chunks or tidbits, undrained
1 lg. can mandarin oranges, drained
1 lg. can peach pie filling
1 lg. pkg. (about 12 oz) frozen strawberries, thawed
2 lg. bananas

Directions:
Combine all ingredients and refrigerate. Add bananas right before serving to reduce browning. You can add any leftover fruit from the week that needs to be used to this as well. Chopped nuts can be added if desired. This salad will keep in the frig up to a week.

Apple Almond Salad
4 cups romaine lettuce, torn into bite-sizes pieces
1/4 cup diced dried apricots or white raisins
1/4 cup sliced almonds
4 green scallion onions, sliced

Dressing:
1/4 cup orange marmalade
2 tbsp. olive oil
1 tbsp lemon juice

In a large bowl mix together romaine, onions, apricots, almonds, and apple. In a small bowl mix dressing ingredients until well blended. Drizzle over salad when ready to serve.

Fudge Frosted Brownies
1/2 cup Plus 2 tbsp butter
6 tbsp cocoa
1 cup granulated sugar
2 eggs
1 tsp vanilla
3/4 all purpose flour


In medium saucepan, melt butter and add cocoa. Remove from heat and stir in sugar. Blend in eggs one at a time and add vanilla. Stir in flour and mix well. Spread into an 8x8x2 greased pan. Bake at 350 for 25-27 minutes.

Frosting:
1 tbsp butter
2 tbsp cocoa
1 cup confectionery sugar
1/3 cup chopped pecan(optional)

Melt butter and add cocoa. Mix in sugar and add enough milk to make mixture creamy, beginning with 1 tbsp milk. Increase milk by 1 tsp at the time. Add pecans if desired and spread over cooled brownies. When completely cooled-slice into squares.


Share/Bookmark

Friday, May 21, 2010

Pumpkin with Cream Cheese Whoopie Pie

One last post on Whoopie Pies....

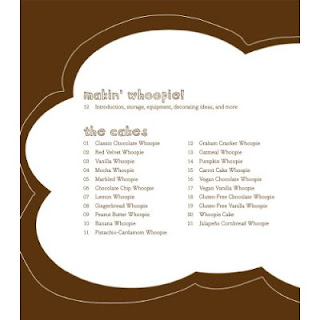
Inside the book is all these recipes for how to make the "cake part" of the Whoopie Pie.
As well as all the creams....Which as you can see, once you get the hang of it then you could make any flavor/kind you wanted.

My pick for today's recipe is-- Pumpkin Whoopie Pie with Cream Cheese Filling
These would be cute with little bows around them, served at a party. They would also be great in a little goody bag. 

Ingredient:
2 1/4 cups all purpose flour
1 teaspoon baking powder
1/2 teaspoon baking soda
1 tablespoon ground cinnamon
1 1/2 teaspoon ground ginger
1 teaspoon ground allspice
1 teaspoon ground nutmeg
1/2 teaspoon salt
1 cup brown sugar
1/2 cup unsalted butter, at room temperature
1 1/2 cups solid pack pumpkin
1 egg
1 teaspoon vanilla

Directions:
Position a rack in the center of the oven and preheat the oven to 350 f. Line two baking sheets with parchment paper. Sift together the flour, baking powder, baking soda, cinnamon, ginger, allspice, nutmeg, and salt, onto a sheet of waxed paper.
In the work bowl of a stand mixer fitted with the paddle attachment, beat together the brown sugar and butter on low speed  until just combined. Add the pumpkin, then the egg, beating well. Add the vanilla and beat until combined.
Add the flour mixture and beat on low until just incorporated, scraping down the sides of the bowl. Using a small ice-cream scoop or 2 tablespoon scoop, drop about 2 tablespoons of batter onto one of the prepared baking sheets and repeat, spacing them at least 2 inches apart.
Bake one sheet at a time for about 15 minutes each, or until the cakes begin to crack an are firm to the touch. Let the cakes cool on the sheet for at least 5 minutes before transferring them to a rack to cool completely.
Makes about 30 four inch cakes

Cream Cheese Filling:
Ingredient
4 ounces of cream cheese, at room temperature
4 tablespoons unsalted butter, at room temperature
3 1/2 cups (one 16 ounce box) confectioners' sugar
1 teaspoon vanilla extract

Directions:
In the work bowl of a stand mixer fitted with the paddle attachment, beat together the cream cheese and butter on medium speed. Add the sugar and beat on low speed until combined. Add the vanilla and increase the speed to medium, beat until cream and smooth, about 4 minutes.

Add in between the cooled cakes and enjoy!

(Recipes by Sarah Billingsley and Amy Treadwell. Pictures by Antonis Achilleos)


Share/Bookmark

Thursday, May 20, 2010

Chocolate Buttercream Whoopie Pie

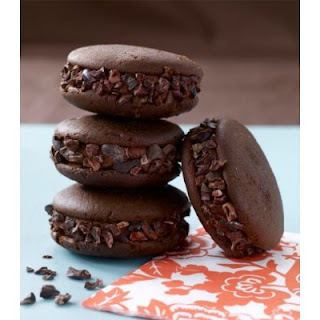
You might remember this picture from yesterday. 
(Taken by: Antonis Achilleos)
This will probably be most peoples first choice so I thought it would be a perfect start to the recipe collection for Whoopie Pies.

Classic Chocolate Whoopie
(The Cake)
1 2/3 cups all-purpose flour
2/3 cup unsweetened cocoa powder
1 1/2 teaspoon baking soda
1/2 teaspoon salt
4 tablespoons unsalted butter, at room temperature
4 tablespoons vegetable shortening
1 cup (packed) dark brown sugar
1 large egg
1 teaspoon vanilla extract
1 cup milk

Directions:
Position a rack in the center of the oven and preheat the oven to 375 F. Line two baking sheets with parchment paper. 
Sift together the flour, cocoa powder, baking soda, and salt onto a sheet of waxed paper. In the work bowl of a stand mixer fitted with the paddle attachment, beat together the butter, shortening, and brown sugar on low speed until just combined. Increase the speed to medium and beat until fluffy and smooth, about 3 minutes. Add the egg and vanilla and beat for another 2 minutes. 
Add half of the flour mixture and half of the milk to the batter and beat on low until just incorporated. Scrape down the sides of the bowl. Add the remaining flour mixture and 1/2 cup milk and beat until completely combined. 
Using a spoon, drop about 1 tablespoon of batter onto one of the prepared baking sheets and repeat, spacing them at least 2 inches apart. Bake one sheet at a time for about 10 minutes each, or until the pies spring back when pressed gently. Remove from the oven and let the cakes cool on the sheet for about 5 minutes before transferring them to a rack to cool completely. Makes about 48 two-inch cakes.

(Chocolate Butter-Cream-the filling)
 Ingredient
1 1/2 cups confection sugar
1/2 cup cocoa powder
4 tablespoons unsalted butter, at room temperature
3 tablespoons heavy (whipping) cream
1 teaspoon vanilla extract
1/2 teaspoon salt

Directions:
In the work bowl of a stand mixer fitted with the paddle attachment, beat together the confectioners' sugar, cocoa, and butter, starting on low and increasing to medium speed until the mixture is crumbly, about 1 minute. Add the heavy cream, vanilla, and salt, and beat on high until smooth, about 3 minutes.

(Recipe and pictures by Sarah Billingsley, Amy Treadwell, and Antonis Achilleos- Whoopie Pies)


Share/Bookmark

Wednesday, May 19, 2010

Making Whoopie

Ok...
So you know I am not really going to talk about making whoopie?? I'm gonna talk about making Whoopie Pies. 
There is a BIG difference. 
But these will put a bounce in your step, put a smile on your face, and a song in your heart. 

About a week and a half ago I mentioned that I bought this book on my trip to Cape Cod.
I had never heard of Whoopie Pies until I saw this book and started researching them more. 
So now you ask--Whoopie Pies -- Is it a cake? Is it a cookie? 
It is a deliciously soft and sweet cream-filled snack that is the shape of a cookie but cake light in taste.
 The Internet is abuzz with recipes and stories of whoopie pie folklore, while customers everywhere are descending on bakeries in droves demanding these delectable treats. 
There is a new trend brewing in desserts that will be making its way to bakeries, weddings and event tables this next year. I'm calling it now--You heard it here first--

This adorable book—the only cookbook devoted entirely to whoopie pies—features more than 40 mix-and-match recipes. With a puffy cover as soft as cake, plenty of color photos and hand-drawn illustrations, dozens of DIY decorating instructions, fun facts and baking tips, Whoopie Pies will make a welcome addition to any baker's bookshelf.

Is your mouth watering yet? 
Do you want to know how to make these?
Follow me tomorrow and I will share with you some mix-match recipes.

Share/Bookmark

Friday, April 23, 2010

Espresso-Chocolate Shortbread Cookies

Last Thursday night I attended a family friends wedding shower. I left my husband home with the boys so they could have boy time with daddy and also b/c wedding showers are no place for 4 year old rambunctious boys or 14 month old babies who like to go to bed by 7:30. So you get the idea as to why I didn't take them....It was a lovely evening spent talking to women I hadn't seen in a while and eating chicken pot pie, salad, rolls, cake, punch, and fruit salad. When I returned home I was not surprised to find my husband counting down the minutes to when these little bad boys would be done. 
 Ok.....
So I was surprised and wondered why he wasn't doing his normal evening reading or completely worn out from the busy night of feeding, bathing, and putting the kids to bed alone.
I actually thought it was really sweet that he would put the kids to bed then high tale it in fast gear to make these from scratch and get it done by the time I got home. Although it was late we both decided we would have one, plus--how could I have said-- No--certainly not after all that hard work.
We also shared some with some work friends and family. By Saturday they were gone and everyone wanted more...
They also get better with age–and really, who doesn’t want that?

My sweet husband also took the time to document the process...Since he knew how much I like to include pictures with recipes. He even said, "You can blog about this."  Well little did he know that I would!

Makes 32-38 cookies
Ingredient:
1 tablespoon instant espresso powder
1 tablespoon boiling water
2 sticks (8 ounces) unsalted butter, at room temperature
2/3 cup confectioners’ sugar
1/2 teaspoon pure vanilla extract
2 cups all-purpose flour
4 ounces bittersweet chocolate (plain, or a toffee variety), finely chopped, or 3/4 cup store-bought mini chocolate chips
Confectioners’ sugar, for dusting (optional)
Directions:
1. Dissolve the espresso in the boiling water, and set aside to cool to tepid.
2. Working with a stand mixer, preferably fitted with a paddle attachment, or with a hand mixer in a large bowl, beat the butter and confectioners’ sugar together on medium speed for about 3 minutes, until the mixture is very smooth. Beat in the vanilla and espresso, then reduce the mixer speed to low and add the flour, mixing only until it disappears into the dough. Don’t work the dough much once the flour is incorporated. Fold in the chopped chocolate with a sturdy rubber spatula.
3. Using the spatula, transfer the soft, sticky dough to a gallon-size zipper-lock plastic bag. Put the bag on a flat surface, leaving the top open, and roll the dough into a 9 x 10 1/2 inch rectangle that’s 1/4 inch thick. As you roll, turn the bag occasionally and lift the plastic from the dough so it doesn’t cause creases. When you get the right size and thickness, seal the bag, pressing out as much air as possible, and refrigerate the dough for at least 2 hours, or for up to 2 days.
4. Position the racks to divide the oven into thirds and preheat the oven to 325 degrees F. Line two baking sheets with parchment or silicone mats.
5. Put the plastic bag on a cutting board and slit it open. Turn the firm dough out onto the board (discard the bag) and, using a ruler as a guide and a sharp knife, cut the dough into 1 1/2-inch squares. Transfer the squares to the baking sheets and carefully prick each one twice with a fork, gently pushing the tines through the cookies until they hit the sheet.
6. Bake for 18 to 20 minutes, rotating the sheets from top to bottom and front to back at the midway point. The shortbreads will be very pale–they shouldn’t take on much color. Transfer the cookies to a rack.
7. If you’d like, dust the cookies with confectioners’ sugar while they are still hot. Cool the cookies to room temperature before serving.

*Recipe originally from Dorie Greenspan but revised my Smitten Kitchen in 2007 and now by Mommy Buzz in 2010. 


Share/Bookmark

Wednesday, April 14, 2010

Yummy, Yummy....

 I am sure most of you have heard or tasted the Buffalo Chicken Dip, usually served with chips. Well this is a similar recipe but with the crescent roll. I think it might be a winner in your home or for your next party. If you need a real crowd pleaser then give it a try!


INGREDIENTS
12oz cream cheese (from two 8-oz packages), softened
2tablespoons Louisiana hot sauce or other red pepper sauce
1/3cup crumbled blue cheese (1 1/2 oz)
1/4cup finely chopped celery
1cup finely chopped cooked chicken breast
2cans (8 oz each) Pillsbury® Place ’N Bake® refrigerated crescent rounds (16 rounds) or 2 cans (8 oz each) Pillsbury® refrigerated crescent dinner rolls
1/3cup LAND O LAKES® Unsalted or Salted Butter, melted
1cup plain or chicken-flavored panko-style bread crumbs

DIRECTIONS
1.Line cookie sheet with sides with waxed paper or cooking parchment paper. In medium bowl, mix cream cheese and pepper sauce. Stir in blue cheese and celery. Stir in chicken until well blended. Shape mixture by tablespoonfuls into 32 (1 1/2-inch) balls; place on cookie sheet. Refrigerate 20 minutes.
2.Meanwhile, heat oven to 350°F. If using crescent rounds, remove from package, but do not separate rounds. If using crescent rolls, remove from package, but do not unroll. Using serrated knife, cut each roll evenly into 16 rounds; carefully separate rounds. Press each round to 3 inches in diameter. Place chilled chicken mixture ball on center of each dough round; shape dough around ball to cover completely.
3.In shallow dish, place melted butter. In another shallow dish, place bread crumbs. Dip dough balls into butter, then roll in bread crumbs. Place 2 inches apart on large ungreased cookie sheet. Bake 17 to 22 minutes or until golden brown. Cool 5 minutes. Serve warm.

 Note: This recipe was taken from the Pillsbury Bake-Off finalists.


Share/Bookmark

Thursday, April 8, 2010

Amazing Cheesecake

Last night my husband brought home a part of a piece of Cheesecake for me to try that his co-worker made. It is kinda funny because I ate lunch at my husbands work on Tuesday and this guy was talking about going home and making a Cheesecake to score high with is wife and that is just what he did. Gus proceeded to tell me that he found the recipe on Smitten Kitchen. Deb the author of this site had just posted a New York Style Cheesecake that I guess obviously was calling out to make. I mean how can you turn something up like that?  This cheesecake below is simply divine tasting, just mouth watering. Even if your not a Cheesecake fan you will be changed forever after tasting this. You must give it a try.

Pictures from Smitten Kitchen

I decided instead of trying to explain it myself I would take the post straight from the author herself. Here is the post and recipe from Deb at Smitten Kitchen.

New York Cheesecake

Adapted from Gourmet Magazine

The changes I made to the original recipe were to one and three-fifths (yes, exactly that) the crumb crust because I like those that go up the walls (you still might have a smidge more than you need but I figure it is less annoying than measuring the recipe in 7 tablespoon amounts), significantly reducing the zest (because as far as I’m concerned, the entire zest from two citrus fruits is an absurdly high amount), fudging (unsuccessfully) with the baking time and adding a completely optional cherry topping. That is not from a can. You are welcome.

Crumb crust
8 ounces (15 4 3/4 x 2 1/2-inch sheets of graham cracker; yes, I am crazy enough to both count and measure) finely ground graham crackers or cookies such as chocolate or vanilla wafers
8 tablespoons (1 stick or 4 ounces or 113 grams) unsalted butter, melted
1/2 cup sugar
1/4 teaspoon salt
Very tall cheesecake filling:
5 (8-ounce) packages cream cheese, softened (Philadelphia is recommended for cheesecakes but if you’ve had success with other brands, feel free to use them again)
1 3/4 cups sugar
3 tablespoons all-purpose flour
1 teaspoon finely grated lemon zest
1 teaspoon finely grated orange zest
5 large eggs
2 large egg yolks
1/2 teaspoon vanilla
Cherry topping
10 ounces sweet or sour cherries, pitted (they’re not in season here so I used frozen; worked just fine)
2 tablespoons lemon juice
1/4 cup sugar*
1 tablespoon cornstarch
1/2 cup water
Make crumb crust: Stir together crust ingredients and press onto bottom and up sides of a buttered (I forgot to do this and had no sticking issues with a non-stick springform) 9 1/2-inch (or 24 cm) springform pan. You can fill it right away but I like to pop my into the freezer so it quickly sets while I prepare the filling.
Make very tall cheesecake filling: Preheat oven to 550 degrees (yes, this is correct). Beat together cream cheese, sugar, flour and zest with an electric mixer until smooth. Add eggs and yolks, one at a time, beating on low speed until each ingredient is Incorporated. Scrape bowl down between additions; I cannot stress this enough as if you do not, you’ll end up with unmixed stripes of cream cheese. I always find at least one, despite my best efforts.
Put spring form pan with crust in a shallow baking pan (to catch drips). Pour filling into crust (spring form pan will be completely full) and baking in baking pan in the middle of the oven for 12 minutes or until puffed. Please watch your cake because some ovens will top-brown very quickly and if yours does too fast, turn the oven down as soon as you catch it. Reduce the temperature to 200 degrees (see Note below about my baking drama) and continue baking until cake is mostly firm (center will still be slightly wobbly when pan is gently shaken), about one hour more.
Run a knife around the top edge of the cake to loosen it and cool the cake completely in spring form on a rack, then chill it, loosely covered, at least 6 hours.
Make cherry topping (optional): Place all ingredients together in a medium saucepan. Bring to a boil. Once it is boiling, cook it for an additional one to two minutes then remove from heat. Cool completely.
Remove side of pan and transfer cake to a plate. If you had any wonky baking issues (see my Note below), you might need to trim the cake flat. I promise not to tell anyone what happened to those scraps, okay?
Spread topping (if using) over chilled cheesecake. The original recipe says to bring this to room temperature before serving, but I never have!
Do ahead: Cheesecake keeps, covered and chilled, 2 weeks.
Baking drama: As some of the pictures might suggest, I really borked (an actual word, thank you) the baking of this cake. First, I was convinced that 550 degrees would singe my cake so I did the first step at 400, to see if you can get away with it. Yes, I am guilty of not following a recipe from time to time too. It turns out, 550 would have been just fine. Then, although I turned my oven down to 200, I didn’t check the thermometer inside my junky oven, and had I, I’d have realized that what my oven calls 200 is more like 150. And an hour later, was almost completely raw. Then I upped it to 300, which my oven told me was actually 250, where it still took another hour to bake and gained many cracks. I blame the fact that the oven didn’t start hot enough, as many others have made this recipe crack-free. What’s the point of me sharing this? To give you a heads up that oven wonkiness may ensue. What matters is that, in the end, you do not take the cake out before it is ready. An accurate oven helps too. I’m going to get right on that.
* You might dial this up by up to another 1/4 cup if you’re using sour cherries. However, if you’re using sour cherries I’m going to assume it is because you like them, and the more tart taste they impart, thus you probably will enjoy this sauce just as much with only 1/4 cup sugar. Look at me, psychologizing!


Share/Bookmark

Wednesday, April 7, 2010

Spring Break...Now what do I cook?

 It can be quite difficult for some to go from cooking for your children at dinner to cooking 3 meals a day for an entire week. Here is an idea that you can try for your family this week that will be easy and loved by all.

Chicken and Bean Burrito

Ingredients

  • 1/2 cup brown rice
  • 2 cloves garlic; 1 smashed, 1 minced
  • Kosher salt and freshly ground pepper
  • 1/2 pound (about 2 cups)frozen diced butternut squash, thawed
  • 1 cup shredded rotisserie chicken, skin removed
  • 1 15-ounce can black beans
  • 1 cup grape tomatoes
  • 1/2 cup fresh cilantro
  • 1/4 cup pickled jalapeno peppers, plus 2 tablespoons pickling liquid (if serving to children-keep Off)
  • 4 8-inch whole-wheat tortillas, warmed
  • 1/2 cup shredded reduced-fat cheddar cheese
  • 1 avocado, sliced
  • Plain low-fat yogurt or sour cream, for serving (optional)

Directions

Heat a medium skillet over high heat. Add the rice and smashed garlic and cook, stirring, until fragrant, 2 to 3 minutes. Add 1 cup water, season with salt and pepper and bring to a boil. Add the squash and reduce the heat to low; cover and simmer, undisturbed, about 25 minutes. Sprinkle the chicken over the rice mixture, cover and remove from the heat.
Meanwhile, make the bean salsa: Drain and rinse the beans, quarter the tomatoes and chop the cilantro and jalapenos. Toss with the pickling liquid and minced garlic in a bowl. Season with salt and pepper.
Stir the chicken-rice mixture and spoon it down the center of each tortilla, then top with half of the bean salsa and sprinkle with the cheese. Fold in the sides and roll up. Slice in half and serve with avocado, the remaining bean salsa and yogurt, if desired.


Share/Bookmark

Friday, April 2, 2010

Easter Dinner

Easter Dinner can be a time to toast winter (well in Florida it would just be the cold) ending and spring hitting full swing with seasonal favorites. Here’s a lighter, simpler Easter menu you might want to try. These recipes will sure be a hit but you won't have to spend tons of time cooking in the kitchen. Recipes Below.

Orange Glazed Ham
Butternut Squash and Vanilla Risotto
Honey Glazed Carrots

Ham is a classic for Easter. Ina Garten’s Orange Bake Ham has a sweet-and-spicy glaze made from orange marmalade, brown sugar and Dijon mustard — a great balance to the smoky meat. This recipe serves 35, so you might want to cut it in half depending on how many people you are cooking for (or invite a crowd). Don’t cut it too much, though — leftovers work well in sandwiches, salads and omelets.
Pair it up with Risotto, which is easy to make, and the combo of rice and spring veggies is like two side dishes in one. Add a side of Honey Glazed Carrots and your meal will be complete. Simple but delicious!


I did use the Food Networks Pictures to show you the food. Yumm!

Orange Glazed Ham

Ingredients


  • 1 (14 to 16-pound) fully cooked, spiral-cut smoked ham on the bone
  • 6 garlic cloves
  • 8 1/2 ounces orange marmalade
  • 1/2 cup Dijon mustard
  • 1 cup light brown sugar, packed
  • 1 orange, zested
  • 1/4 cup freshly squeezed orange juice

Directions

Preheat the oven to 350 degrees F. Place the ham in a heavy roasting pan.
Mince the garlic in a food processor fitted with the steel blade. Add the marmalade, mustard, brown sugar, orange zest, and orange juice and process until smooth. Pour the glaze over the ham and bake for 1 hour, until the ham is fully heated and the glaze is well browned. Serve hot or at room temperature.


Butternut Squash and Vanilla Risotto


Ingredients

  • 4 cups vegetable broth
  • 1 large vanilla bean
  • 3 cups peeled cubed (1-inch wide) butternut squash, about 12 ounces
  • 2 tablespoons butter, plus 1 tablespoon
  • 3/4 cups finely chopped onion (from 1 onion)
  • 1 1/2 cups Arborio rice or medium-grain white rice
  • 1/2 cup dry white wine (or cooking wine- found on the seasoning row)
  • 1/2 cup freshly grated Parmesan
  • 1/2 teaspoon salt
  • 2 tablespoons finely chopped fresh chives

Directions

In a medium saucepan, warm the broth over medium-high heat. Cut the vanilla bean in half lengthwise. Scrape out the seeds and add them, and the bean, to the broth. When the broth comes to a simmer reduce the heat to low. Add the butternut squash to the simmering broth and cook until tender, about 5 minutes. Using a slotted spoon remove the butternut squash to a side dish. Turn the heat on the broth down to very low and cover to keep warm.
Meanwhile, in a large, heavy saucepan, melt 2 tablespoons of the butter over medium heat. Add the onion and saute until tender but not brown, about 3 minutes. Add the rice and stir to coat with the butter. Add the wine and simmer until the wine has almost completely evaporated, about 3 minutes. Add 1/2 cup of the simmering broth and stir until almost completely absorbed, about 2 minutes. Continue cooking the rice, adding the broth 1/2 cup at a time, stirring constantly and allowing each addition to of the broth to absorb before adding the next, until the rice is tender but still firm to the bite and the mixture is creamy, about 20 minutes total. Discard the vanilla bean. Turn off the heat. Gently stir in the butternut squash, Parmesan, the remaining tablespoon of butter, and salt. Transfer the risotto to a serving bowl and sprinkle with chives. Serve
immediately.


Honey Glazed Carrots


Ingredients

  • Salt
  • 1 pound baby carrots
  • 2 tablespoons butter
  • 2 tablespoons honey
  • 1 tablespoon lemon juice
  • Freshly ground black pepper
  • 1/4 cup chopped flat-leaf parsley

Directions

In a medium saucepan, bring water to a boil. Add salt and then carrots and cook until tender, 5 to 6 minutes. Drain the carrots and add back to pan with butter, honey and lemon juice. Cook until a glaze coats the carrots, 5 minutes. Season with salt and pepper and garnish with parsley.


Share/Bookmark

Monday, March 29, 2010

{Good Morning Monday}

This past weekend was one of those weekends that flew by. First I will tell you about the stuff that isn't any fun that I dealt with.
I battled a bad migraine for most of the weekend. It came and went and when I just about thought I had relief it would come back. At one point I literally felt like my eyes were pounding in and out of my head. It was not fun AT ALL. Then the baby had a fever for most of the weekend. It seemed to stay around 101. 4-102 but would go higher as soon as the 4-6 hour medicine limit came around. I don't know of one specific thing that could have cause it because he has a tooth coming in, a cold, and is raspy again. He now has a terrible rash on his bottom due to all the pooping he has been doing.
I know you just couldn't wait to here that.
As soon as he goes potty I clean his diaper but I think it is so acidic to his little bottom that nothing is helping. I feel terrible and last night I just held him in tears as he cried himself to sleep. He is was so miserable.
But I have a good report this morning-- it was great to see him smiling when I went in his room to get him. His fever has broke and he is acting normal again. I am so thankful!

So about the fun stuff-  I attended a childhood friends baby shower on  Saturday and it was great seeing her again. It had been along time--to long-- really. 
We also had family in town from Tuesday of last week til Saturday. It was my husbands Aunt and Cousin that came for a short visit.I tried to enjoy every moment I got to spend with them because we never know how long it may be before we see them again. They don't live close so with kids and traveling it makes it really hard to see them as often as we would like. Plus our Cousin is expecting and so she won't be traveling much anymore either.
But the main reason for this post is to share with you a simple but delicious recipe. Called Sour Cream Coffee Cake. We enjoyed this cake over the duration of our families visit and thought it might be a great recipe for you to have on hand.


Coffee Cake

Ingredient
1 stick of butter
1 cup sugar
2 eggs
8 ounces Sour Cream
2 cups all purpose flour
1 tsp. baking powder
1 tsp baking soda
1 tsp vanilla

Sugar Mixture
1 tablespoons sugar
1 tablespoon brown sugar
1 tablespoon cinnamon

Directions
Mix the butter, 1 cup sugar, and eggs to creamy. Then add sour cream. Add flour, baking powder, baking soda, and vanilla.
Pour half of the mix into a bunt pan. Pour half of your sugar mixture on the first layer of mix. Then add the remaining cake mix. Top with the left over sugar mix.
Bake at 350. Honestly I have never timed it so I would say 30 minutes to start out and just keep checking it from there. I think it usually take around 45 minutes in my oven.
Enjoy!

Share/Bookmark

Wednesday, March 24, 2010

Homemade Butter in Minutes


homemade butter in less than 10 minutes... It's funny how when you tell the average person that you make your own butter, they look at you as if you've never heard of things like electricity and modern day conveniences. Maybe that's because their only memory of making butter involved two hours of non-stop shaking of a Mason jar of cream back in kindergarten days. But honestly, if you have ten minutes on your side and a pint of heavy cream, then you can have fresh, homemade butter without the least bit of effort.

Homemade Butter
2c heavy whipping cream
salt to taste (I used a pinch of kosher salt)

Pour the cream into a food processor. Blend for 6-10 minutes until the cream forms into a ball. Remove the solids from the liquid. Squeeze out the excess liquid and pat butter into a dish.

It is pretty cool how the liquid comes together. The first four minutes, it comes together looking like thick whipped cream. Then within a minute of two, it starts to curdle and the liquid separates almost immediately. Another minute or two later, you have a nice round ball of butter.
It taste fresh and you can call it your own. So give it a try!


Share/Bookmark

Tuesday, March 16, 2010

St. Patrick's Day Dishes


St. Patrick's Day is tomorrow and I had these excellent recipes. I am not one who makes a big deal about this day but since some of you might like to make an Irish dish, I found these just for you. They are all pretty good recipes so I had a hard time picking 1, so I gave you all 3. 

And... recipes always look better with pictures.

Irish Beef Hand Pies

Ingredients

Makes 8
  • 1 tablespoon vegetable oil
  • 1/4 head green cabbage, shredded
  • 1/2 pound red potatoes, scrubbed and diced
  • 1 pound ground beef sirloin
  • 3 tablespoons tomato paste
  • 1/2 teaspoon Worcestershire sauce
  • 1/2 teaspoon dried thyme
  • Coarse salt and ground pepper
  • All-purpose flour, for rolling
  • 2 pie crusts (9 inches each), homemade or store-bought

Directions

  1. Preheat oven to 400 degrees. In a medium saucepan, heat oil over medium; add cabbage and potatoes. Cook until beginning to brown, 7 to 9 minutes. Add beef; cook, breaking up meat with a spoon, until no longer pink, about 5 minutes. Stir in tomato paste, Worcestershire, thyme, and 1 cup water. Cover, and cook until potatoes are tender, about 15 minutes. Lightly mash mixture with a fork. Season with salt and pepper. Let cool completely.
  2. On a lightly floured work surface, roll each crust into a 14-inch square; cut each into 4 equal squares. Place 1/2 cup filling on one half of each square, leaving a 1/2-inch border around the filling. Brush borders with water; fold dough over filling to enclose. Crimp edges with a fork to seal. With a paring knife or scissors, cut 3 small vents in each.
  3. Transfer pies to 2 foil-lined rimmed baking sheets; bake until golden brown, 10 to 12 minutes, rotating sheets halfway through.
  4. To Freeze: Prepare through step 2. Arrange unbaked pies on a baking sheet (they should not touch); freeze until firm, about 1 hour. Wrap each pie in foil. Place in a resealable plastic bag; freeze up to 2 months.
  5. To Bake from Frozen: Proceed with step 3, increasing baking time to 28 to 30 minutes.


Irish Lime Squares 

Ingredients

Makes 16
  • FOR THE CRUST
  • 4 tablespoons (1/2 stick) unsalted butter, melted and cooled, plus more for pan
  • 2/3 cup shelled pistachios
  • 1 cup (4 ounces) graham-cracker crumbs
  • 1/4 cup sugar
  • 1 tablespoons grated lime zest
  • FOR THE FILLING
  • 2 large egg yolks
  • 1 can (14 ounces) sweetened condensed milk
  • 1/2 cup fresh lime juice

Directions

  1. Preheat oven to 350 degrees. Brush an 8-inch square baking dish with melted butter. Line bottom with parchment paper, leaving a 2-inch overhang on two sides.
  2. In a food processor, finely grind pistachios with graham-cracker crumbs, sugar, and zest. Blend in butter. Press mixture into bottom and 1 inch up sides of prepared pan. Bake until lightly browned, 8 to 12 minutes. Cool crust, 30 minutes.
  3. To make the filling: In a large bowl, whisk together egg yolks and condensed milk. Add lime juice; whisk until smooth. Pour filling into cooled crust; carefully spread to edges.
  4. Bake until set, about 15 minutes. Cool in pan on rack; then chill at least 1 hour before serving. Using parchment paper overhang, lift out of pan, and transfer to a cutting board. With a serrated knife, cut into 16 squares, wiping knife with a damp kitchen towel between each cut. To store in refrigerator, cover with plastic wrap.

Irish Soda Bread

Ingredients

Serves 16
  • 3 tablespoons unsalted butter, melted, plus more for pan
  • 4 cups all-purpose flour, plus more for kneading
  • 3/4 cup sugar
  • 3/4 cup raisins
  • 2 tablespoons caraway seeds
  • 1 teaspoon baking soda
  • 1 teaspoon salt
  • 1/2 teaspoon baking powder
  • 1 1/2 cups buttermilk
  • 2 large eggs

Directions

  1. Preheat oven to 350 degrees. Butter a baking sheet. In a large bowl, combine flour, sugar, raisins, caraway seeds, baking soda, salt, and baking powder. In a separate bowl, whisk buttermilk, eggs, and 2 tablespoons butter. Stir the wet mixture into the dry ingredients to form a dough.
  2. Knead dough on a lightly floured surface until smooth, about 4 minutes; add more flour as needed to prevent sticking. Form dough into a 9-inch round; place on prepared baking sheet. Brush loaf with remaining tablespoon butter. Using a sharp knife, score an X on top of loaf.
  3. Bake until skewer inserted in center comes out clean, 45 to 50 minutes. Cool on wire rack before serving.


Share/Bookmark

Wednesday, March 10, 2010

Chicken Marbella

This dish is simply--amazing...
My husband, kids, and mom loved this dish when I made it for them last week. Even though it has unusual ingredients in it and it might be out of the ordinary, you have to give this dish a try.
Serve the dish with mashed potatoes, noodles, or rice.
I hope you really do give it a try and love it as much as we have.

Chicken Marbella
Serves 10-12

4 chickens, 2 1/2 lbs each, quartered (I used all chicken breasts) ( You could also use 8-10 chicken breast)
1 head of garlic, peeled and finely pureed (I just minced it all-it's a lot and time consuming)
1/4 cup dried oregano
coarse salt and freshly ground black pepper to taste
1/2 cup red wine vinegar
1/2 cup olive oil
1 cup pitted prunes
1/2 cup pitted Spanish green olives
1/2  cup capers with a bit of juice
6 bay leaves
1 cup brown sugar
1 cup white wine (or cooking white wine)
1/4 cup Italian parsley or fresh coriander (cilantro) finely chopped

1. In a large bowl combine all the ingredients EXCEPT the last three on the list. Cover and let marinate, refrigerated, overnight.

2. Preheat oven to 350 F

3. Arrange chicken in a single layer in one large baking pan and sppon marinade over it evenly.  Sprinkle chicken pieces with brown sugar and pour white wine around them.

4. Bake for 50 mins. to 1 hour, basting frequently with pan juices.


Share/Bookmark

Tuesday, March 9, 2010

Avocado and Healthy Skin?


A weird combination right?? That is what I thought. As I was reading an article the other day about healthy skin I came across avocado's and how they effect your skin. As we all know, what we eat and drink has alot to do with how our skin looks. So why eat an avocado?

Avocados are high in fat, but most of the fat is mono-unsaturated and thus is considered a healthy fat. An avocado is a good food for skin because, as is the case with omega-3 fatty acids, it keeps skin plump and youthful looking it also helps prevent dry skin.
Avocados contain both vitamin C and vitamin E, which act well together as a powerful skin anti-aging combination. 
So the next time you are wanting to have a healthy appetizer or spice up your meat try this recipe below. 

 Pineapple and Avocado Salsa

This is an interesting mix but would be excellent on Chicken, Pork, or Fish. It would also taste great to add cream cheese and serve with chips or crackers.

Ingredients

  • 1 (14-ounce) can sliced pineapple in juice, drained and juices reserved
  • 1 tablespoon lime juice
  • 1 tablespoon honey
  • 1 tablespoon extra-virgin olive oil
  • 1 small jalapeno, seeds removed and diced
  • Kosher Salt and freshly ground black pepper
  • 1/2 red onion, finely chopped
  • 1 medium avocado, halved, pitted and flesh cubed
  • 2 tablespoons minced cilantro leaves

Directions

In a medium bowl, make the dressing by mixing 2 tablespoons of pineapple juice with the lime juice, honey, oil and jalapeno. Season with salt and pepper, to taste. Add the pineapple and onion. Gently fold in the avocado and cilantro. Let the flavors blend for at least 15 minutes before serving.


Share/Bookmark

Thursday, March 4, 2010

How To: Make Cake Pops

Yesterday I gave you some pictures of the Cake Pops that I am going to show/tell you how to make today. 
So get out your pen and paper and let's get started.
First you will need to choose what kind of pop you want to make. Here are some ideas: cake pops, brownie pops, cheesecake pops, pound cake, etc. and then your choice of chocolate. White, Dark, or Milk Chocolate. You can also use food coloring to make whatever color you want with your white chocolate.

These are the items I chose to use while decorating and making the pops.

Cake with Icing

 Cake Balls
1 box yellow cake mix (cook as directed on box for 13 X 9 cake)
1 can cream cheese frosting (16 oz.)
1 package chocolate bark
wax paper
plastic or wooden sticks
decoration items

1. After cake is cooked and cooled completely, crumble into large bowl.

2. Mix thoroughly with 1 can cream cheese frosting but save a small amount to dip your sticks in. (It may be easier to use fingers to mix together, but be warned it will get messy.)
3. Roll mixture into quarter size balls and lay on cookie sheet. (Should make 45-50. You can get even more if you use a mini ice cream scooper, but I like to hand roll them.)
4. Chill for several hours. (You can speed this up by putting them in the freezer.)
5. Melt chocolate in microwave per directions on package or double boiler
6. Take a Tiny bit of extra icing and dip the top of your sticks into it. Then place them half way through your cake ball.

7. Roll balls in chocolate and lay on wax paper until firm. (Use a spoon to dip and roll in chocolate and then tap off extra.)
I also only melt a few pieces of chocolate bark at a time because it starts to cool and thicken. It’s easier to work with when it’s hot.
If you choose to use a double boiler then do you won't need to worry about how much you melt.
8. Decorate and Have Fun
Let me know if you have any questions!
Have Fun
 Here are some finished ones:

 Fun ones for the kids
  
Chocolate with coconut.These are the ones that I chose to do. So I covered mine with coconut and dark chocolate.
   
A Small Gift Idea Using Valentines Day as the Theme

So I am going to overload you with a few more pictures. This is to help a few of you out who mentioned maybe doing these for a baby shower.


Share/Bookmark
Related Posts with Thumbnails